DIY Metalliprinttausta ystävänpäivään / DIY Goldfoil printing for valentine's

Feb 15, 2015

DIYgoldfoilprint1

Ihanaa ystävänpäivää muruset! Toivottavasti kaikki pääsee viettämään sitä rakkaittensa kanssa. Sulhon ollessa vielä muilla mailla minä lähden viettämään iltaa kaveriporukalla, mutta sitä ennen vähän lahja-asiaa. Ystävänpäivää vartenhan ei mielestäni varsinaisesti mitään tarvitse hankkia, mutta tänä vuonna tuntui siltä että jotenkin olisi kiva juhlistaa kuluvaa vuotta. Olen viime aikoina innostunut kaikesta kullan- ja hopeanhohtoisesta joten kun tajusin että metalliprinttejä voi tehdä kotikonsteinkin oli pakko päästä kokeilemaan.

DIYgoldfoilprint2

Metalliprintteihin tarvitset
- Paperia (tavallinen tulostuspaperi käy kokeiluihin, mutta vielä paremmin toimisi oikein sileäpintainen kartonki)
- lasertulostin
- tarkoitukseen valmistettua metallifoliota, omani tilasin täältä
- laminointikone auttaa prosessissa

Ensiksi tulosta haluamasi teksti lasertulostimella (huom! Mustesuihku ei käy). Nyt, jos käytössäsi on laminointikone niin käytä ihmeessä sitä, jos ei niin lasertulostimellakin homma toimii. Leikkaa foliosta pala joka peittää tekstin ja kiinnitä se kulmista teipillä. Folion kiiltävän puolen tulee jäädä ylöspäin. Syötä laminointikoneen läpi seuraten ohjeita jotka tulevat folion mukana tai aseta paperi tulostimeen ja tulosta tyhjä sivu. Kuumuus kiinnittää folion tekstiin ja voit irrottaa ylimääräisen vetämällä pois. Ja ta-daa, mahtava folioprintti on valmis!

Itse olen homman kanssa vielä vähän testausvaiheessa ja printit eivät ole täydellisiä. Se ei kuitenkaan itseäni niin haittaa koska homma on sen verran hauskaa! Lupaan vinkkailla kun keksin parannuskeinoja. Hyviä vinkkejä myös, täällä ja täällä.

Printtailen lisäksi hankin J-m:lle vanhan taskukellon puvun kanssa käytettäväksi. Siksi oli pakko oli printata tuo teksti, sopi niin hyvin kellon kanssa ;)

Hei lisäpisteet sille joka keksii mistä biiseistä tekstit ovat peräisin! Nyt suuntaan sinne bileisiin, näkyillään!

DIYgoldfoilprint3

Happy Valentine's Day you all! I hope everyone gets to spend it with their loved ones. As J-m's still out of town, I'm celebrating with friends this year. But before that, I want to share my valentines day gift idea with you.
I don't necessarily get any gift for valentines, but this year I felt like doing something. I've been really into everything golden silver lately so when I learned that you can make metal foil prints at home I just had to try.


For DIY metal foil prints you need
- paper (normal printing paper works but I thin a bit thicker, coated paper would be ideal)
- a laser printer
- metal foil for printing (I got mine from here)
- a laminating machine, if you have one


First, print your text with a laser printer (toner printer won't work!). If you have a laminating machine you should use it to attach the foil. Just follow the instructions delivered with the metal foil. However if you don't have a laminating you can also use the laser printer (that's what I did). Just cut a piece of foil that'll cover the text, place it on text and tape the corners so it stays in place. Remember always to put the foil the shiny face upwards! Add it to your printer and this time print a blank page. The heat will attach the foil to the text and you can just peel off the extra. Ta-dah, your metal foil print is done!

I'm still experimenting with this technique so the results are not perfect yet. But I don't really mind because the process is so much fun! I promise I'll keep you posted if I come up with any good tips. I personally found these articles really helpful.

I also got a vintage pocket watch for J-m. That's also why I just had to print that particular text ;) Ten points to anyone who recognizes from which songs the quotes are from! Now I have to get ready for the party, see you!

signature

DIY hiirimatto / DIY mousepad

Feb 6, 2015

mousepad3

Hei toivottavasti perjantai on alkanut hyvin! DIY-jutuilla jatketaan, ja vähän samalla linjalla kuin säilytyslaatikoitten kanssa: kaipasin nimittäin siisteyttä myös työpöydälle. Vanha valkoinen ikean hiirimatto on meillä palvellut jo vuosia, joten väri ei enää ollut kaikkein kauneimmillaan. Onneksi kotoa löytyi pala nahkaa jolla sen sai nopsasti uudistettua!

mousepad1

Uudistettuun hiirimattoon tarvitset:
- vanha hiirimatto
- nahkaa (mahdollisimman ohutta)
- kynä
- sakset
- sopivaa liimaa (voit ensin testata, ettei se tule nahasta ikävästi läpi)
- sivellin
- kirjoja tms. painoksi
- tarvittaessa valkoinen vedenkestävä tussi

mousepad2

Ohjeet

1. Jos hiirimaton kangaspinta on kulunut ja lähtee helposti pois, irrota se. Jäljennä hiirimaton muoto nahalle kynän avulla. Leikkaa tarkasti seuraten viivaa.

2. Levitä liimaa ohuesti koko hiirimaton päälle. Liimaa nahka kiinni.

3. Aseta kirjojen tms. painon alle lepäämään kunnes liima on kuiva. Voit halutessasi laittaa muovia tms. suojaamaan kirjoja jos pelkäät että liima voi tulla läpi.

4. Jos haluat, käy läpi hiirimaton reunat valkoisella tussilla jotta koko matto on siisti!

Ta-daa! Siinäpä se. Helppoa vai mitä?

Hei ihanaa viikonloppua kaikille, meikätyttö suuntaa tosiaan Suomeen kolmeksi päiväksi, meinaan ainakin syödä niin monta runebergintorttua ja laskiaispullaa ettei tosi!


mousepad4

Hey I hope you're having a great Friday! I'll continue with a DIY which kinda goes well together with the storage boxes I just made, since I also needed my desk to be a bit nicer looking. I have had this basic Ikea mousepad for years now and the colour was super faded. Luckily I had a piece of tan colored leather in hand to upgrade it!

You're going to need:
- old mousepad
- piece of leather (as thin as possible)
- pencil
- scissors
- suitable glue (you can make a test on the leather beforehand to see if it works)
- paintbrush
- white permanent marker if needed

Instructions

1. If the fabric cover of the mousepad is faded and goes off easily just gently peel it off. With a pencil duplicate the shape of the mousepad on the leather. Cut following the pencil line.

2. Spread the glue evenly and thinly on the mousepad with the paintbrush. Glue the piece of leather to the mousepad.

3. Let rest under an heavy object (like books) untill the glue is entirely dry. If you're afraid that the glue might come through you can use a piece of plastic to protect your books.

4. Color the sides of the mousepad with a white marker if needed to give your mousepad a finishing touch.

Ta-dah! So simple isn't it?

Hope you all have a great weekend, I'm heading back to Finland for three days and I'm so excited!


signature

DIY SÄILYTYSLAATIKOT / DIY STORAGE BOXES

Jan 30, 2015

DIYboxes5

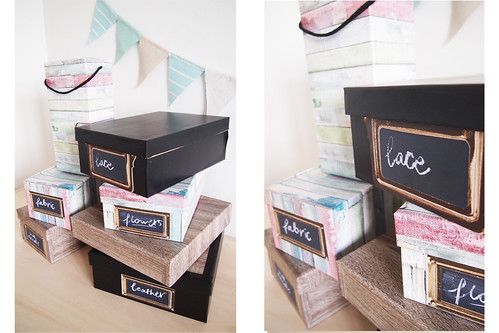
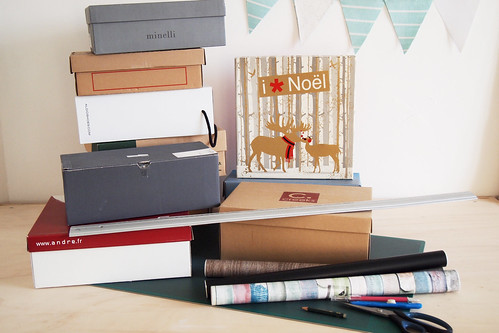
Näin vuoden aluksi ainakin itselläni on aina tarve järjestellä elämääni - niin konkreettisesti kuin kuvainnollisestikin. En tiedä teistä, mutta meillä ainakin on aina tarvetta lisäsäilytystilalle, ja nämä vanhat laatikot on lojuneet varastossa jo jonkun aikaa. Vähällä vaivalla niistä saa kaikista yhteensopivat värillisillä kontaktimuoveilla. Tiedän toki että kontaktimuovi ei ole kaikkein ekologisin ratkaisu, mutta nämä löytyi onneksi paikallisesta ylijäämävarastosta ja olisivat siis muuten menneet roskiin. Ja muutenkin, jos välttää täysin uusien laatikoiden ostamisen niin sehän on jo plussaa!


DIYboxes

Uudistettuihin säilytyslaatikoihin tarvitset:
- kenkälaatikoita, lahjapakkauksia, ym
- kontaktimuovia
- mattopuukko
- viivoitin
- leikkuualustan
- sakset
- kynän

DIYboxes2

Ohjeet

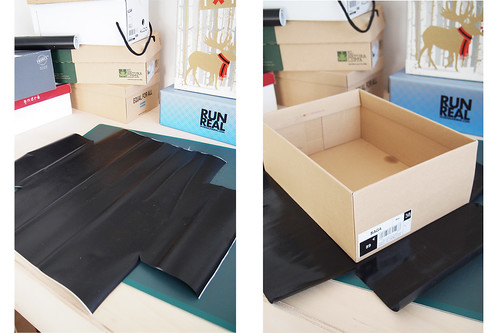
1. Kaksiosaiseen laatikoiden päällystäminen on helpointa aloittaa pohjasta. Mittaa kontaktimuovista pohja ja sivut, leikkaa sopivan kokoinen kappale. Jätä ylimääräistä yläreunoihin sekä jokaisen sivun yhteen lappeeseen. 

2. Leikkaa kappale. Irrota suojakalvo ja aseta laatikko muovin päälle. Siloita kuplat.

DIYboxes3

3. Nosta kaksi vastakkaista sivua (tässä pitkät sivut) ylös ja kiinnitä hyvin. Käytä tarvittaessa viivoitinta silottamiseen.

4. Tee sama toisille sivuille. Taita ylimääräinen pala lappeelta ensimmäisten sivujen päälle. Näin saat viimeistellyt reunat.

5. Yläreunassa taita ylimääräinen osa joko sisälle tai leikkaa mattopuukolla reunoja seuraten.

6. Tee sama kannelle.

DIYboxes4

Muunmallisten laatikoiden kanssa pitää vähän improvisoida. Muutaman laatikon paketoitua hommasta pääsee kyllä aika nopeasti jyvälle! Itse lisäsin vielä liitutaulutarrat jotta jokaisen laatikon sisällön voi kätsysti merkata. 

Heh, tässäpä hyvää tekemistä vaikka viikonloppuun vai mitä ;) Oikein hyvää viikonloppua kaikille, itse aion käyttää viikonlopun sekä lepäilyyn että muutamien projektien edistämiseen!

DIYboxes5

I don't know about you but at the beginning of the year I always want to reorganise my life - both figuratively and literally. We needed some new storage solutions and we had these old shoe boxes lying around. I decided to spruce them up with some contact paper and now they all match. I know I know, contact paper is maybe not the most ecoligical choice but I found mine in a local surplus shop so otherwise they would have been thrown away. And if you get to use something that you already have instead of throwing it away that's always a great thing anyway!

You're going to need:
- empty cardboard boxes
- contact paper
- utility knife
- ruler
- craft cutting board
- scissors
- pencil

Instructions

1.It's easiest to start with the bottom part of the box. Measure the bottom part and all the sides. Remember to leave extra to the upper part (to be folded inside the box) and to at least two of the sides (to be folded under the other two side pieces).

2. Cut the piece. Peel off the paper. Place the box on the contact paper trying to avoid forming bubbles.

3. Now attach the side parts. Here I started with the long sides. Use a ruler if needed to smoothen out as you go.

4. Do the same thing with the other sides. You should have some extra to fold over the first sides you did to get a perfect finition.

5. When you get to the top edge, either use the utility knife to cut out the extra or fold to the inside of the box.

6. Repeat all the steps with the lid.

You'll have to improvise a bit with the boxes that are of different sizes but it's really easy to get the hang of the thing! I added some blackboard stickers for marking down what's inside.

So here's an idea for this weekend, right? ;) Have a great weekend everybody, I'm going to relax but also work on some projects!

signature

DIY Pahvinen joulukuusi / DIY Cardboard Christmas Tree

Dec 19, 2014


christmastree3

Jep jep, joulu on jo ovella mutta mitä tehdä jos perinteinen kuusi ei innosta? Me ollaan jo pidemmän aikaa J-M:n kanssa haluttu tehdä joulukoriste joka olisi helppo laittaa esille joka vuosi. Kun keittiörempasta jäi jäljelle reilusti pahvilaatikoita, oli valinta helppo: pahvinen, koottava joulukuusi. Idea ei toki oli kaikista originaalein, näitähän löytyy muualtakin, mutta kuusi oli tosi hauska valmistaa ja lisäksi se on tehty täysin kierrätysmateriaalista. Siksipä päätin jakaa teidän kanssa tämän helpon DIYn, tulostettavine malleineen. 

Jos joulunaikaan löytyy hetki vapaata aikaa niin tämän saa vielä valmiiksi ennen joulua. Toivottavasti tykkäätte! Laittakaa kommenttia jos on kysymyksiä, ja jos joku päättää kokeilla niin olis mahtavaa kuulla miten teidän versiot onnistui.

christmastree2


DIY pahvinen joulukuusi 

Tarvikkeet:
- isoja pahvilaatikoita tms
- mattopuukko
- metalliviivoitin
- leikkuualusta
- teippiä
- tulostin
- kynä
- halutessasi maalia, hileitä tms kuusen koristeluun


Ohjeet

1. Lataa ja tulosta oheinen PDF- tiedosto. Kuusi on A3- paperin kokoinen joten saatat joutua tulostamaan sen useammassa osassa ja teippaamaan osat yhteen. Voit toki tulostaa kuusen pienempänäkin, minikuusi olisi tosi söpö! 


Kolme kuusta ovat identtisiä, vain lovet ovat eri kohdissa. On ihan mahdollista tulostaa vain yksi kuusi ja piirtää lopuksi lovet mallin mukaan oikeassa koossa.

2. Leikkaa tulostamasi kuusi ääriviivoja pitkin.

3. Sijoita leikkaamasi kuusi pahvin päälle, piirrä ääriviivoja pitkin ja leikkaa mattopuukon ja viivoittimen avulla.

4. Toista sama kunnes sinulla on 3 kuusta. Leikkaa lovet oikeisiin kohtiin.

5. Kokoa kuuset yhteen.

Voilà! Voit joko jättää kuusen sellaisekseen tai koristella sen maalilla tai vaikka decoupage-tekniikalla. Me teimme lisäksi kuuselle jalustan loppupahvista, mutta homma toimii kyllä ilmankin.


Ihanaa joulunodotusta, ja laittakaa tosiaan kommenttia jos testaatte!

christmastree1

So the Christmas season's already upon us, but what to do if you're not into buying a traditional Christmas tree? We pondered over this question with J-M and decided to do our own version of a Christmas tree. We wanted to do something that would be easy to store for next year plus we already had plenty of cardboard at hand, so the choice was obvious. I know you can find this kind of trees elsewhere as well, but it was such fun to put together that I decided to share our version with you, with downloadable pattern and all.

So if you happen to have some extra time this Christmas season I recommend to give it a try! If you should have any questions don't hesitate to leave a comment. Also, if you decide to make your own I'd love to hear it! 


DIY cardboard christmas tree


Materiels:

- Cardboard (Big cardboard boxes or similar)
- Cutter or utility knife
- Metallic ruler
- Cutting mat
- Tape
- Printer
- Pencil
- Paint, glitter etc for decoration (optional)

Instructions:


1. Download and print the pattern. Note that it's size A3 so you might have to print several pages and tape them together. You can also make a smaller size, a mini tree would be really cute!


As you can see, all three trees as the same except for the slots. To save paper and time you can print just one of these trees, use it as a model, and then cut the slots so that they correspond.


2. Cut the Christmas tree you just printed.


3. Place the Christmas tree model on cardboard, trace following the lines and cut with a cutter, using the ruler and the craft mat.


4. Repeat until you have 3 Christmas trees. Cut the slots in each tree.


5. Assemble.


And you're ready! You can either leave the cardboard as it is or use paint, glitter etc. to decorate it. You can also use the extra cardboard to make a pedestal, but it should also hold together without.


Have a great weekend and please leave a comment if you liked this tutorial!


DOWNLOAD THE PATTERN:


Jouluisia ideoita / Christmas ideas

Dec 7, 2014


Vaikka jouluun toki kuuluu kaikenlaista hässäkkää niin siitä huolimatta olen kyllä jouluihmisiä. Mikäs sen parempaa ajanvietettä kuin kuunnella joululauluja ja väkerrellä muutamia joululahjoja tai koristeita, glögin taikka punaviinilasin kera tietty!

Tänä viikonloppuna isännöidään pikkujouluja meidän luona ja vaikka aika viime tinkaan kaikki järjestelyt jääkin, niin jotain jouluista pitäisi kyllä keksiä. Tässä muutamia ideoita Pinterestin puolelta, pitää katsoa mitä saadaan toteutettua. Olettekos te jouluihmisiä? Onko muita jouluisten askarreluiltamien kannattajia?


Love these stars and that Christmas tree!

Even though christmas is such a busy time I still love it. What would be better than spending an evening listening Christmas carols and doing some DIY?

We're throwing a small get-together for some friends this weekend and we sure should come up with some Christmas decorations. Here's some ideas from Pinterest, we'll see what we'll have time to do! Am I the only one over here who loves the Christmas time? Are you planning to make some decorations or gifts by yourself?

MakerFaire Paris this weekend!

Jun 20, 2014


This weekend I'll be teaching how to make "himmeli", traditional finnish christmas ornaments, at the MakerFaire Paris. If you happen to be here come to say me hi! Below some more info in french. Have a great weekend and see you there!


Hei ja hyvää juhannusta kaikille! Meikätyttö ei juhlikaan tänä vuonna perinteisesti jussia vaan lähtee koko viikonlopuksi pitämään himmelityöpajaa Pariisin MakerFaire- happeninkiin. Voipi suomalaisittain kuulostaa tosi nurinkuriselta tehdä himmeleitä keskikesällä, mutta ite kyllä tykkään himmeleistä niin paljon että mikseivät sopisi joka vuodenaikaan :) Mutta jos satutte olemaan Pariisissa niin suosittelen tätä tapahtumaa. Alapuolella lisätietoa ranskaksi. Hyvää viikonloppua kaikille!


Si vous avez un peu du temps ce week-end, venez me faire voir au Centquatre! Pendant le MakerFaire Paris vous pouvez participer à mon atelier Himmeli et apprendre à fabriquer ces objets décos scandinaves traditionnelles.

Sinon c'est quoi au juste, le MakerFaire? 

Maker Faire, l’événement international arrive enfin en France ! Les 21 et 22 juin 2014, Paris accueillera sa première édition au CENTQUATRE-PARIS. Le public pourra ainsi découvrir le phénomène du Maker Mouvement au travers de démonstrations, ateliers et conférences. Les exposants appelés « Makers » sont des inventeurs, créateurs qui partagent la passion de la fabrication sous toutes ses formes  (couture, menuiserie, cuisine, impression 3D, robotique, physique, chimie…). Cet événement pour tous, est un moment d’échange unique entre les Makers et les visiteurs qui seront incités à participer à différents ateliers, selon la règle d’or : nous sommes tous des Makers !

à bientôt alors, et passez un bon week-end!
signature

My new toy: pfaff passport 2.0

Mar 14, 2014


So the last time I mentioned I was getting a new sewing machine. And here it is: pfaff passport 2.0!

P3135879P3135892
It's nice to be able to move from one country to another rather easily (my bf being french we've moved between France and Finland a couple of times already) but there are inconveniences as well. Like the fact that I had to leave my good old sewing machine behind the last time we moved! I knew that I needed one over here as well (I just can not imagine a life without a sewing machine!) and I didn't want a similar as my other machine, because it seemed silly to own two machines that are just alike.

So after some consideration I went and bought this baby! It seemed like a good quality and it's one of the smallest on the market, making it easy to carry everywhere with you (thus the name!). For me, who has a small atelier at home and who might need to take the machine with me to give sewing classes etc, it was a perfect option. 


P3135885P3135889
After making a couple of projects with it already, I can only say: so far so good! It's a smaller machine so it doesn't have all the features that some new models do have, but it's definitely enough for sewing clothing and things for home. There are also some cool stuff like the button for immediate tie-off, which is a nice and quick finish option.

I'm not gonna do a full review at least quite yet, but if you have questions please feel free to ask! Now I'd love to know: do you have a sewing machine and if so what kind? Are you like me and cannot do without or are you total opposite? Anyway, I'll be soon back with some new projects!


P3135904P3135919
Kuvissa uusin kaunokaiseni: pfaff passport 2.0. Jouduin jättämään ihanan ompelukoneeni Suomeen joten uuden hankinta oli täällä edessä! Valinta kohdistui tähän ihan vaan helpon liikutettavuuden takia, ja tähän  mennessä oon kyllä ollut tosi tyytyväinen!

Onko sulla ompelukonetta ja jos on niin mikä malli? Kuulutteko samaan kastiin kuin minä (eli elämää ei ole ilman ompelukonetta) vai eikö ompelu innosta? Olisi hauskaa kuulla teidän lukijoiden mielipiteitä! Mutta hei, palataan pian asiaan ,mulla on nimittäin jo muutamia valmiita projekteja näytettäväksi!

DIY heart stamped scarf for valentines

Feb 13, 2014

P2125399
Hi all! As all of you know, valentines day is just around the corner. Luckily, we don't necessarily have to buy valentines stuff to make it special, since we can also DIY! I wear a lot of scarfs, since it adds easily colour to an outfit and also keeps me warm. So I thought of making an easy valentines-themed stamped scarf tutorial for you guys as well! Here we go:

P2115353P2115360
MATERIALS
- Fabric of your choice, keeping in mind it should be natural fibres. I used 130x75cm (approx 50x30 inch) piece. Note also that fabric must be washed before printing on it!
- Fabric colour 
- Carving block
- Paint brush
- I cut my stamp with a big shot machine, but you can also cut it by hand with an utility knife!
- a piece of foam rubber
- an iron (not pictured)
- a sewing machine / needle and thread if you want to finish the edges of your scarf (not pictured)

note: you don't really need the glue pictured, at first I thought making a handle to my stamp but finally I didn't need that!

INSTRUCTIONS

1. Start by cutting your heart shape out of the carving block either with a cutting machine or by hand.

P2115380P2115389
2. With a help of a brush, add fabric paint on your foam rubber. Stamp your heart shape on the colour making sure the color get evenly everywhere. Then stamp your fabric with the heart shape. You can use any kind of flat, hard object to help you press the shape evenly to the fabric (I used the cutting boards of the big shot machine).

P2115383
3. That's all! Now just keep repeating the stamping process. Note that you might get some colour on your fingers and that some of the heart shapes will definetily not come out perfectly, but in my opinion that's part of what makes DIYing so fun. Remember to add colour every now and then!

P2115392
4. Keep going untill you're happy with the result. Let dry and iron, following the instructions of your fabric paint. Finish the edges as you want: sew them with a sewing machine or by hand, or let them raw depending on your fabric. For now, I didn't finish the edges of my scarf, but when I'll get a better sewing machine I think I might!

That's all folks. Hope you liked it! Have you done any projects for the valentines day this year? Do you have any plans? See you soon!

P2125405

Nopea moikkaus täältä ja pieni ohjeistus helpon sydän-huivin painamiseen, näin ystävänpäivä mielessä. Tuo big shot-kone on kyllä kätevä muotojen leikkaamiseen mutta käsin leikkaamallakin pärjää mainiosti! Ei sitten muuta kuin ohjeita seuraamaan niin vielä ehtii päästä hempeisiin tunnelmiin huomenna :) Jos on jotain kysyttävää niin kysykää ihmeessä!

Oletteko itse tehneet mitään ystävänpäiväprojekteja? Tai onko erityisiä suunnitelmia huomiseksi? Kuullaan taas!

DIY Outdoor cushions

Sep 3, 2013

P8291843
P8291841
As we still have some sunny days left we've been trying to enjoy the garden before the real autumn strikes! That in mind, I wanted to make us some outdoor floor cushions to make it easy and comfy to sit on our lawn and have a drink or maybe eat some bbq.

P8291789
P8291847
We had these colourful rugs in our basement. We used them in our previous place, but they're actually quite small & slippery, so we ended up not using them at all in our current house. So, repurpose as a cushion seemed like a good plan.
P8291829P8291828
P8291842
There are several tutorials for similar projects on internet (such as this). But how I did, basically, was just to hand-sew two ends together with a big needle and a strong, doubled thread. My rugs were the perfect size so I didn't even have to cut them, which could be a but tricky.

P8291857
On the other side I laid the fabrics in a way that they overlap a bit in the middle. I didn't bother to make a system for closingthe pillows, but they work just fine for me like this! The inside cushions are out of old sheets and filled with small styrofoam balls from an old beanbag chair. So actually, there are three unused objects merged in one in this project.

P8291826
P8291782ladybug approves!
They're actually really comfy and sturdy so I'm quite pleased with this project. I could also imagine having them inside at home for winter. Hope you like them as well! See you soon!

Pikkuprojekti kesän loppuun: tyynyt vanhoista räsymatoista. Olipa helppoa ja nopeaa, ei tarvinnut kuin ommella sivut yhteen karhunlangalla, kun matot olivat just sopivan kokoisia. Sisälle tein sisätyynyt vanhasta lakanasta ja ikiaikaisen säkkituolin styroksitäytteestä. Eli kolme käyttämätöntä juttua sulautui yhdeksi, jota ollaan nyt sitten oikeasti käytetty ulkona. Ja miksei nämä kävis myös sisällekin, eikö vaan! Toivottavasti tykkäsitte, näkyillään!

Petit Helsinki All rights reserved © Blog Milk Powered by Blogger